


In this tutorial, Tami Bastiaans is sharing one of her go-to techniques — using Distress Embossing Glazes with the iron-off resist method to create beautifully layered effects! She combined this technique with Distress Spritz, Inks, and more to bring this sweet card to life.
Distress Embossing Glaze Iron-off Resist Card by Tami Bastiaans
- Materials
- Instructions
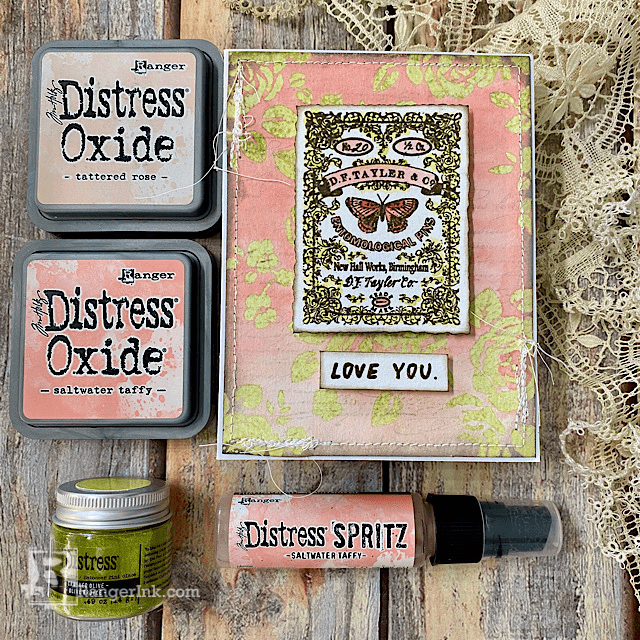
Tim Holtz Distress® Embossing Glazes: Crushed Olive, Abandoned Coral
Tim Holtz Distress® Embossing Dabber
Tim Holtz Distress® Ink Pads: Lost Shadow, Tumbled Glass, Broken China
Tim Holtz Distress® Oxide Pads: Saltwater Taffy, Tattered Rose
Tim Holtz Distress® Spritz: Tumbled Glass, Saltwater Taffy
Tim Holtz Distress® Watercolor Cardstock
Tim Holtz Distress® Blending Brush
Tim Holtz Stampers Anonymous Layering Stencil Flourish
Tim Holtz Stampers Anonymous Cling Mount Stamp French Marketplace
Tim Holtz Stampers Anonymous Cling Mount Stamp Classics #17
Tim Holtz Stampers Anonymous Cling Mount Stamp Tattoo You
Tim Holtz Tonic Media Surface Mat
Tim Holtz Distress® Waterbrush Detailer Tip
Tim Holtz Deckle Torn Edge Trimmer
Other:
Iron
Tim Holtz Stampers Anonymous Layering Stencil Rose
White A2 card base
Instructions
Hello Makers! Continuing with resist techniques, today I have a card to share with you using Distress Embossing Glazes. Many years ago, I learned this iron-off resist technique with clear embossing powder and I loved it. So when Tim Holtz and Ranger Ink brought us Distress Embossing Glazes, I wanted to try iron-off resist with the Distress glazes in place of the clear embossing powder. I was so pleased with the way the Glazes worked, that it has become a staple technique for me. Today I’m sharing it with you, so I’m inviting you to come along and let’s get making!

Step 1: Gather the supplies.

Step 2: Using a script background stamp, such as French Marketplace CMS071, stamp script over an A2 piece of Watercolor Cardstock with Lost Shadow Distress Ink. Distress Ink is used because it is water reactive and will lighten with later steps. Dry with a heat tool.

Step 3: Put a stencil, such as Flourish THS032 or Roses THS075, over the stamped background. Apply Embossing Ink by dabbing ink onto the stencil with a Dabber or Ink Pad and work it in with a Blending Brush (or Blending Foam) through the stencil onto the background. Apply the Embossing Ink in both corners of the stamped A2 piece.

Step 4: Spread Embossing Glaze over the areas with the Embossing Ink and shake off excess. Return excess to the jar, then heat Embossing Glaze until it is translucent.

Step 5: Using a Blending Tool, make a blended background over the entire piece of A2 watercolor Cardstock with Distress Ink or Distress Oxide.

Step 6: Spray the background several times with water, then with a spray or two of Spritz. Set aside to dry naturally. Do not use a heat tool.

Step 7: Once dry, heat up an iron. This can be either a craft iron or a regular iron. Turn the steam off. Dry iron only. Place a clean piece of A2 Watercolor Cardstock over the embossed background. Lay a piece of copy paper over both and iron over the top taking care not to shift either piece.

Step 8: The goal is to remelt the Glaze. As it melts it will soak into the Watercolor Cardstock on top. After ironing for a minute or so, long enough to be sure all the Glaze has remelted, separate the two pieces of watercolor cardstock. The Ink or Oxide and Spritz were resisted by the glaze on the first piece, (the two on the left) and the Glaze soaked into the second piece leaving an opposite image that will also resist ink in a different way (the two on the right.) You can blend a background on the second piece of Watercolor Cardstock. This technique yields two backgrounds each time.

Step 9: Stamp a focal piece onto a piece of Watercolor Cardstock, such as Classic #17 SCF017 or Tattoo You COM032, and emboss with Distress Embossing Glaze. Watercolor the image with Distress Ink and Distress Spritz if desired. Trim a small mat around the edges of the image with the Deckle Trimmer. Attach the image onto the center of the card front with dimensional adhesive like foam dots or foam tape.

Step 10: Stamp a sentiment, samples used Noteworthy CMS446, on a strip of Watercolor cardstock and emboss with Distress Embossing glaze. Attach in the bottom center of the card. Machine stitch around the outside if desired. Adhere the finished card front to a white A2 card base. The photo shows all four card fronts, two with the embossed glaze on the top and the two on the bottom with the mirrored ironed-off glaze.

Thank you so much for following along with the tutorial. I hope you will give this Distress Embossing Glaze Iron-off technique a try. It’s fun and addicting!
 Tami is a school teacher by trade, but has been crafting in some way or another most of her life. She started scrapbooking 25 years ago as a hobby outside of work. A few years later she discovered the world of Tim Holtz Distress, which led to a whole new love of stamping, die cutting, and Idea-ology. Check out Tami on her Plays Well with Paper social media sites - Instagram, YouTube, and Blog.
Related Posts
Product Play: Archival Inks, Stickles, and Doodling with Miriam Prantner
Add eye-catching texture and shimmer to your cards like Miriam Prantner did with this stunning floral design! In this tutorial,...
Read More
Liquid Pearls Mother's Day Card by Lauren Bergold
This gorgeous Mother's Day card by Lauren Bergold is full of shimmer, texture, and creativity. She used Liquid Pearls in...
Read More